Browsing "Older Posts"

cactus mug rug tutorial

By Hatun Comak → Thursday, April 19, 2018


Hi there! My mug rug with cactus applique is ready! Although it is a small project and takes little time to finish, it has the same steps as big quilt. If you are new in quilting and want to start from somewhere, this little quilt may give you some inspiration. Or you just want to make something in a short time. Mug rugs are also great as gifts.
Now I'll tell how to make a mug rug. I hope it will be helpful for you. If anything missing or not clear about the instructions, please let me know, so that I can fix it. Here we go!

Instructions

The first thing to do is to prepare the top quilt. For this mug rug I preferred cactus applique pattern. For PDF with various cacti patterns, click below.
                                        
Choose one of the cacti and prepare it for applique with english paper piecing. Below is the cactus I chose. After pressing with iron, remove the papers inside and it is ready for appliquing.


Cut a piece of fabric measuring 8"x8". Mug rugs differs in size. This is the measure I used. Place the cactus to the center of the fabric, pin and baste it and then you can start appliquing it.


When the top is ready, you should now sandwich it. Backing, batting and the quilt top are put and pinned together. I take the three layers at the same size. If you need some more detailed information about how to make a quilt sandwich, click HERE for another post of me that gives detailed information about quilt sandwich.


the quilting as you like, either by hand or machine. I prefer hand quilting, though. I quilted on the cactus in order to make it more alike as a cactus. I liked it in the end. I also quilted around and on the pot and added a little sun on the right corner of the background fabric.


After quilting, trim the edges. For binding, cut 2,5" wide stripe. Fold it double, as in the photo and iron it.


Start pinning the binding to the wrong side of the quilt. When you come to the corner, turn the binding up as you can see in the photo. Then turn it back down, continue pinning around the quilt. Start sewing from the corners until the next corner. Sew every side of it seperately.


Press the seams with iron. Turn the binding to the right side and pin the binding to the right side. Sew all around the quilt by machine. To me, the most difficult part of the binding is making corners, but by this way of binding, you'll have proper corners. 


And your mini quilt is ready! Enjoy the process and please let me know if you have any questions. I know that it is not perfect but it is unique as I made it.


pineapple with hexagons quilt pattern tutorial

By Hatun Comak → Wednesday, April 11, 2018


Nowadays I like dealing with the things related to fruits; blocks, patterns, appliques, whatever. This is the second pineapple I made and shared in my blog. The first one was a pineapple block and now I designed a pineapple pattern which is combined with hexagons. Actually I was inspired by a fabric pattern and thought why not to make it as patchwork. And I like the result. It may be  turned into a wall hanging, cushion or something that I haven't decided yet but it is pretty cool! Below is the step by step tutorial with pictures for those who would like to make one also.

Instructions

  • You will need 10 hexagons of 1" and 8 triangles. 
  • Hexagons and triangles are prepared by english paper piecing. When you baste the hexagons, triangles and leaves which makes of 5 pieces, sew them together, press them with iron and remove the papers.
  • Place the pieces on fabric as can be seen in the picture and pin them.


  •  Baste the pieces on fabric so that you can applique more easily. Now you are ready to start for appliquing.


  • Once you have finished appliquing all pieces, you stitch around the hexies and triangles as you can see in the photo below.


pineapple block tutorial

By Hatun Comak → Thursday, April 5, 2018


When I finished making strawberry block, I thought I would make some more fruit blocks because they are so lovely and cute. So I'll be making fruit blocks nowadays. The second fruit is a pineapple block. 
I made Jackie Padesky's pineapple block. Free pattern is available on the internet. Below is the photo of the pattern I drew.


It is as cute as the strawberry block and I really enjoyed doing it. Why dont you give a try, too?

Pineapple block is made the same way with strawberry block. You can have a look at the Strawberry block tutorial here and learn how to make a fruit block . Below are the numbers and measures of scraps that you will need.

          16x2" yellow                         2x2.5" green 1               2x2" white
          2x2.5" yellow                        1x2.5" green 2               4x2.5" white
                                                      1x2.5" green 3

I used six different yellow fabrics, you can choose the numbers and shades of yellow according to your scraps. These were the ones that I had. 


It is fun to make fruit quilt block patterns, so more will be coming.

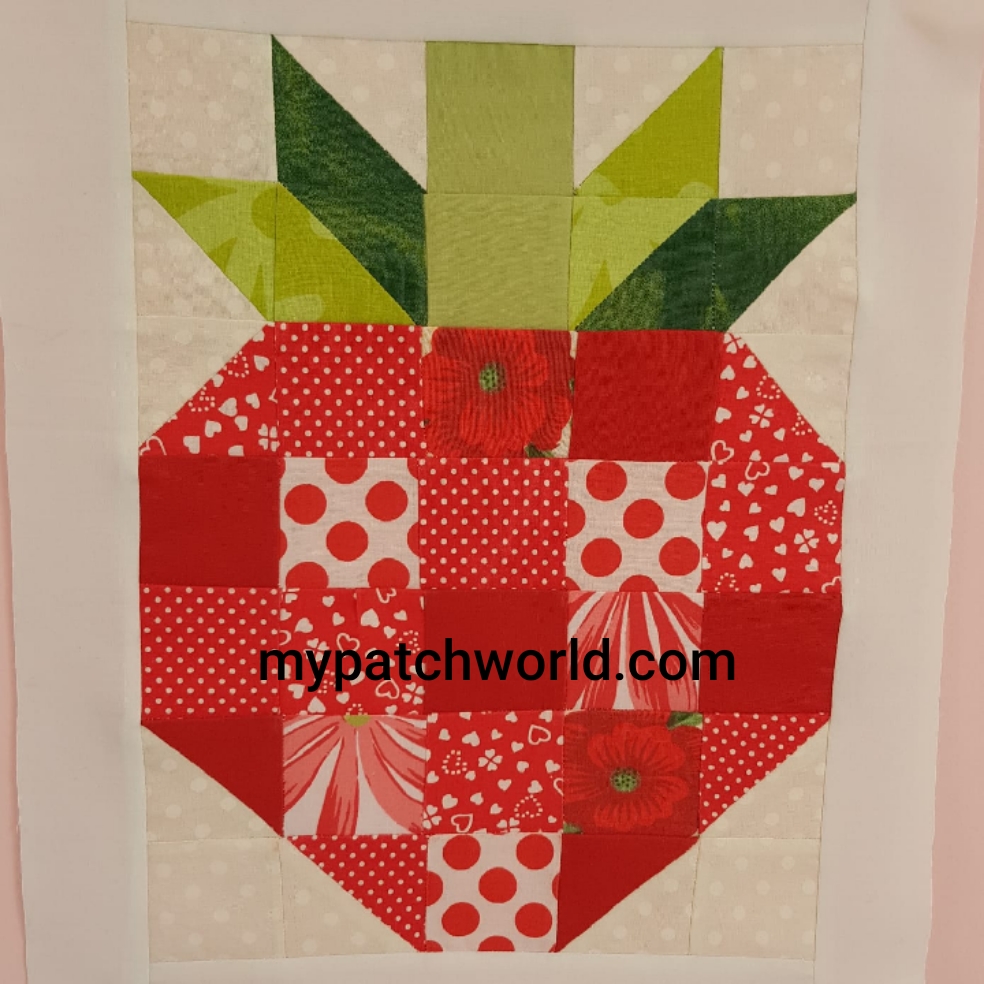
strawberry block tutorial

By Hatun Comak → Monday, April 2, 2018


I’m sure everybody likes strawberries. I saw these strawberry blocks on the net and have been waiting for the right time to make one of them. So here is the result. I think I managed it well and want to share how I made it with step-by-step tutorial in case you would like to make one for yourself.

There is no pattern for this block. It is a combination of 2” squares and half square triangles. You need red or pink, green and white color fabric. It is  a perfect pattern to use your scraps also. For red I used 6 different fabrics. You can use more or less depending on your stash. The block is 7.5” x 10.5” in the end.  

Below are the pieces yo need to cut:

17 x 2”  red                        2 x 2.5” green 1                4 x 2”     white
3 x 2.5” red                        2 x 2.5” green 2                5 x 2.5”  white
                                         2 x 2”    green 3

Instructions

  •    Cut the pieces of fabrics according to the measurements and colors mentioned above.


  •     Take five white squares of 2.5” and 1 green square of 2.5”. You need to turn these into half square triangles (HSTs). Draw a diagonal line as seen in the photo. 


  •       Pair these marked squares with the remaining 2.5” squares.


  •     Sew them together a quarter inch from your guide lines. Sew both sides of the guide line.


  •     Cut along the guideline so you have two triangles.  Press with iron, press seams open. Note that you press in every step of sewing process.


5  
6     - Your hsts will be larger than 2” square, you should measure and trim them to 2”.


  • Arrange all in squares and HSTs as in the picture. First sew squares in rows and don’t forget to press seams. Then sew the rows together to create the final block. Press it.

8    
And it’s finished! I’m happy with the result. I’m sure you’ll be with yours, too. Don’t forget, sewing is fun! Any questions? Don't hesitate to ask, please.


easter quilts: bunny wall hanging

By Hatun Comak → Sunday, April 1, 2018

Happy Easter to all!


I designed a bunny pattern for a wall hanging. If you want to make something in a short time, this bunny is for you. It is also perfect as a gift. The bunny has a pocket in which some items can be put.
Because sewing should be fun, the pattern is designed with simplicity and practically with easy to follow step-by-step instructions.
                                                     
Download the pattern here

  • Draw the pattern on the fabric and cut it with seam allowance. Make a three layer sandwich; top, batting and back together and sew them together with the machine. Leave the bottom unsewed so that you can turn the right side from here.
  • When you turn the right side, stitch around the bunny with a thread  same colour. For the face make some embrodierment.


For the pocket, cut the piece and applique it on the bunny. I used big buttons for the rounds and added a ribbon on the neck. So it is ready. Have some fun with my bunny wall hanging.